How to Turn a Template Into a Client Website and Hand It Over
A freelancer's process for building client websites from templates: brief, rewrite, brand, test, connect the domain and transfer ownership.

Nkosinathi Mbokazi, Founder of Bloqpage
November 14, 20266 min read
To turn a template into a client website, collect the client's content first, start from the closest template, rewrite every section for their business, apply their brand once in the site theme, test forms and links on a phone, connect their domain, then transfer the site to their own account. The steps below follow that order, with the Bloqpage screens for each.
Why start from a template at all?
A template gives you the structure a client would otherwise pay you to design: page order, section layouts, spacing and a mobile version that already works. Your time goes into the part only you can do, which is making the site sound and look like the client's business.
Clients also find it easier to say yes to something they can click. On the templates page, press Live demo on any design and send the link before you start. "Like this, but for your bakery" is a five-minute conversation.
What should your quote include?
Template projects go wrong when the client expects a custom design and you planned a template. Put these in writing before you start:
- What they get: the template you will start from (send the live demo link), the number of pages, and which sections you will change.
- What they supply, and by when: logo, photos, prices, reviews and domain logins. Say that the launch date moves if content arrives late.
- Rounds of changes: for example, two rounds of edits after the first draft, with extra rounds charged per hour.
- What is not included: writing every word, product photography, or uploading a large product catalogue, unless you price them in.
- Running costs and who pays them: the Bloqpage plan, the domain renewal, and any payment provider fees if they sell online.
- After launch: whether you transfer the site to them or keep maintaining it, and what a change costs later.
Step 1: Get the content before you open the builder
Most client projects stall waiting for words and photos. Ask for these at the start and do not begin until you have them:
- Logo files, brand colours and any fonts they already use
- Services or products with real prices
- Contact details: phone, WhatsApp, email, address and opening hours
- Ten or more photos of their work, team or premises
- Three or four short reviews from real customers
- Logins for their domain, if they have one, plus a note of the existing email (MX) records
If they are moving from an old website, take screenshots of it on a computer and a phone. You will want them when the client asks "where did the old page go?"
Step 2: Pick the closest template and make your own copy
Open Templates in the dashboard sidebar, filter by the kind of business and press Use this template. Name the site after the client and press Create Website. You get your own copy, so the template stays the same for everyone else.
Free templates are open to everyone. Paid templates are included with Pro and Business, or you can buy one on its own.
Step 3: Rewrite every section for the client
Leftover example copy is the fastest way to make a site look cheap. Go through every section, including the footer and the "page not found" page, and replace headings, text, prices, opening hours, photos, links and contact details.
To save time, open Bloq AI and describe the client's business. When it suggests a template, choose Use it for my business and Bloq AI rewrites the template's copy to match before you start editing. Read every line afterwards: AI does not know the client's real prices or what they are proud of.
Delete any section the client does not need. Select it and press Delete in its toolbar.
Step 4: Apply the brand once, in the theme
Set the client's colours and fonts in Project Settings, under the website theme, rather than block by block. Every page picks them up, and a later change takes one edit.
Upload their logo and photos to Assets so they are in one place, and set the site name, description and browser favicon under Brand & Identity.
Step 5: Set up the contact form so enquiries reach the client
Drag a form from Blocks, then Forms. Open Content, then Forms, create the form and put the client's email address in Notification email. Back on the page, select the form block and choose it under Store submissions in.
Send yourself a test from the live site. The message appears under Content, then Submissions, and a copy goes to the notification address.
Step 6: Test like the client's customers will
Before you show the client, check on a real phone:
- Every button and menu link goes somewhere sensible
- The form sends and the notification arrives
- Phone numbers open the dialler and the WhatsApp button opens a chat
- Each page has its own title and description in Page Metadata
- Photos load quickly and every image has a description
Step 7: Connect the client's domain
In the builder, open Project Settings, then Custom Domain, type the domain and press Add Custom Domain.
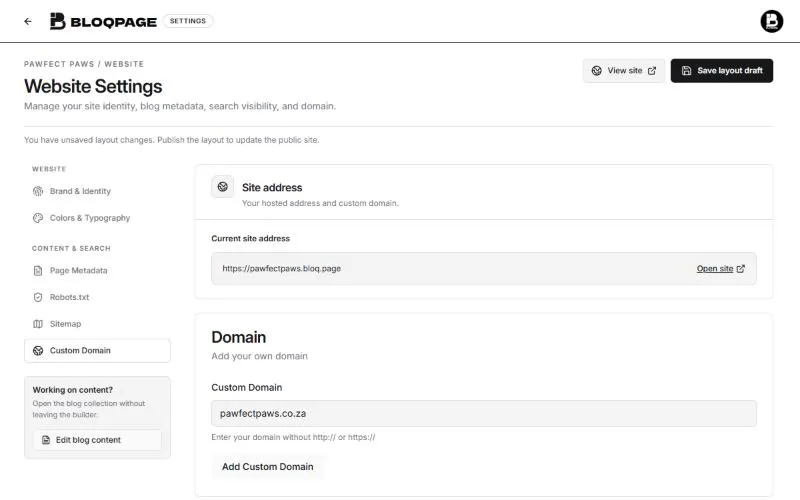 The Custom Domain settings in Bloqpage, with the free bloq.page address shown and a client's .co.za domain ready to add
Bloqpage shows one record: an A record for the main domain, or a CNAME for a subdomain such as www or shop. Add it where the domain's DNS is managed and leave the nameservers and email records alone, so the client's email keeps working.
Most domains connect within minutes, and it can take up to a day. If the DNS is on Cloudflare, set the record to DNS only.
Step 8: Hand the site over
You have two good options.
Transfer it to the client. On the dashboard, open the menu on the site's card and choose Transfer. Enter the client's email address and Bloqpage emails them a link. When they accept, ownership, publishing control and analytics move to their account. The link expires after seven days.
Keep it and give them access. If you will keep maintaining the site, invite the client to your workspace from Workspace Settings, then Members, and limit them to their own website under Website Access. Pro includes up to five members and Business up to ten.
Agencies running several client sites usually choose Business: five websites, five custom domains and priority support. See the full comparison on the pricing page.
A handover checklist
Before you hand over, send the client a short note covering:
- Their live address and how to sign in
- Where enquiries and orders arrive, and which email gets notified
- How to change text and photos on the most common sections
- Who renews the domain, and when
- Your support terms after launch
A two-minute screen recording of the builder, showing them how to change a price, saves you a dozen small requests later.
Common questions
Can I use a paid template for a client site?
Yes. Use it on a plan that includes paid templates, or buy that template once. Each site you create from it is its own copy.
Will the client's email stop working when I connect the domain?
Not if you change only the record Bloqpage asks for. Leave the MX and TXT records for email exactly as they are.
What does the client need to pay for after the transfer?
The site moves to the client's own account, so their plan covers it from then on. Plans start at R149 a month in South Africa, with a free 14-day trial.
Building your first client site? Start a free trial and use any template's live demo as your pitch.